-
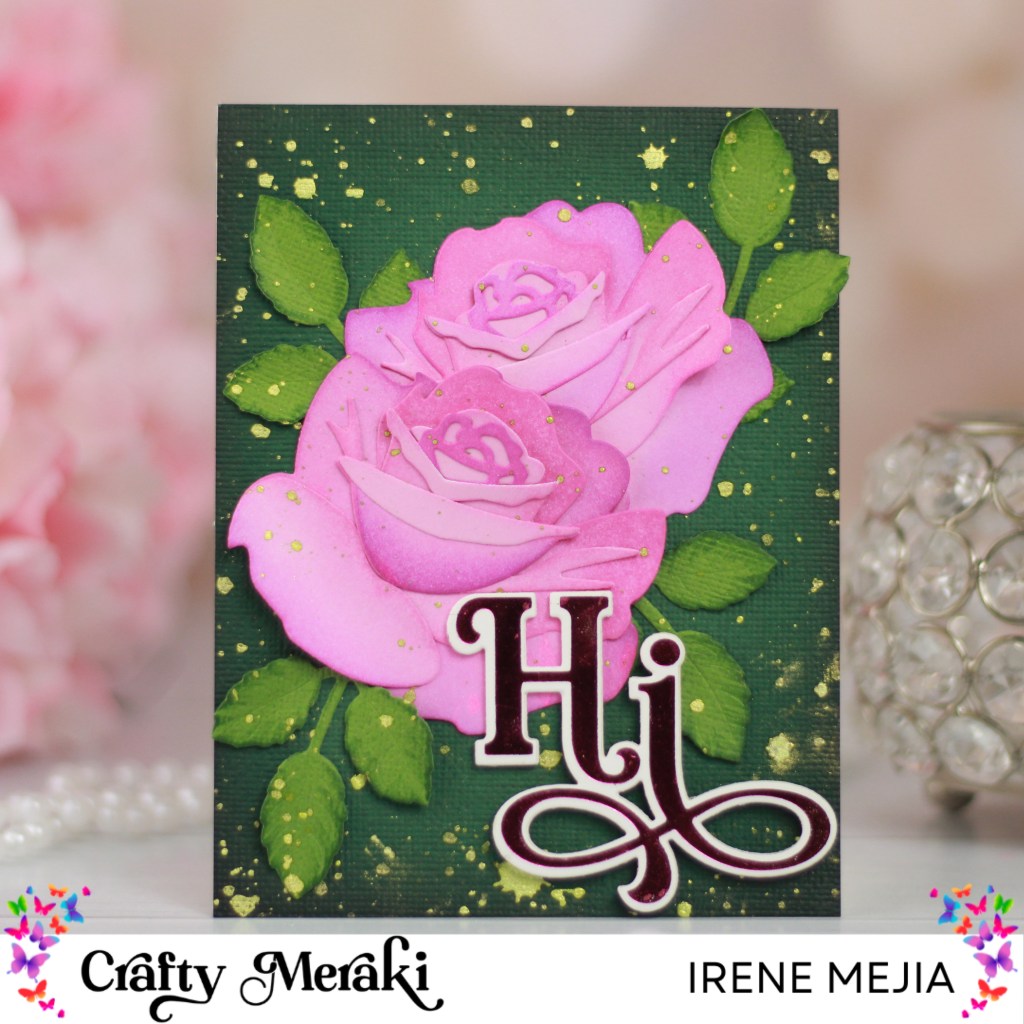
Merakiversary 2024 Giveaway Blog Hop

🎉✨ As Crafty Meraki celebrates its 4th anniversary this month, we’re throwing a huge party with our Brand new #Merakiversary Release! 🥳🎂 It’s been an incredible journey, and we’re beyond grateful for your unwavering support every step of the way. Thank you for FOUR AMAZING years of crafting adventures, and your unwavering support. Here’s to…
-
Meraki Hugs Blog Hop and Giveaway
🌸✨ Get ready to fall in love with crafting all over again with Crafty Meraki’s #MerakiHugs New Release! 🎉 Experience the ultimate crafting joy as we introduce a delightful twist to sentiments and unveil stunning new layering floral dies – a first for CM! Discover the ease of use and beauty of florals, guaranteed to…
-
Give Thanks- Heartfelt Harvest
I created a card using three of my favorite new products from the Heartfelt Harvest release from Honey Bee Stamps. I started by stamping the Give Thanks stamp onto kraft cardstock with the Bee Creative Clear Embossing ink. I heat-set it with white embossing powder and cut it with the coordinating dies. Next, I stamped…
-
Pixi Dust Designs Bergenia Card
I created a single Bergenia card on a rich inky background. I started with an A2-sized background and masked the edges with low tack tape. I blended Catherine Pooler Inks in Aquatini and Minted onto the exposed card stock until I achieved the desired look. Next, I lightly inked the edges of the floral petals…
-
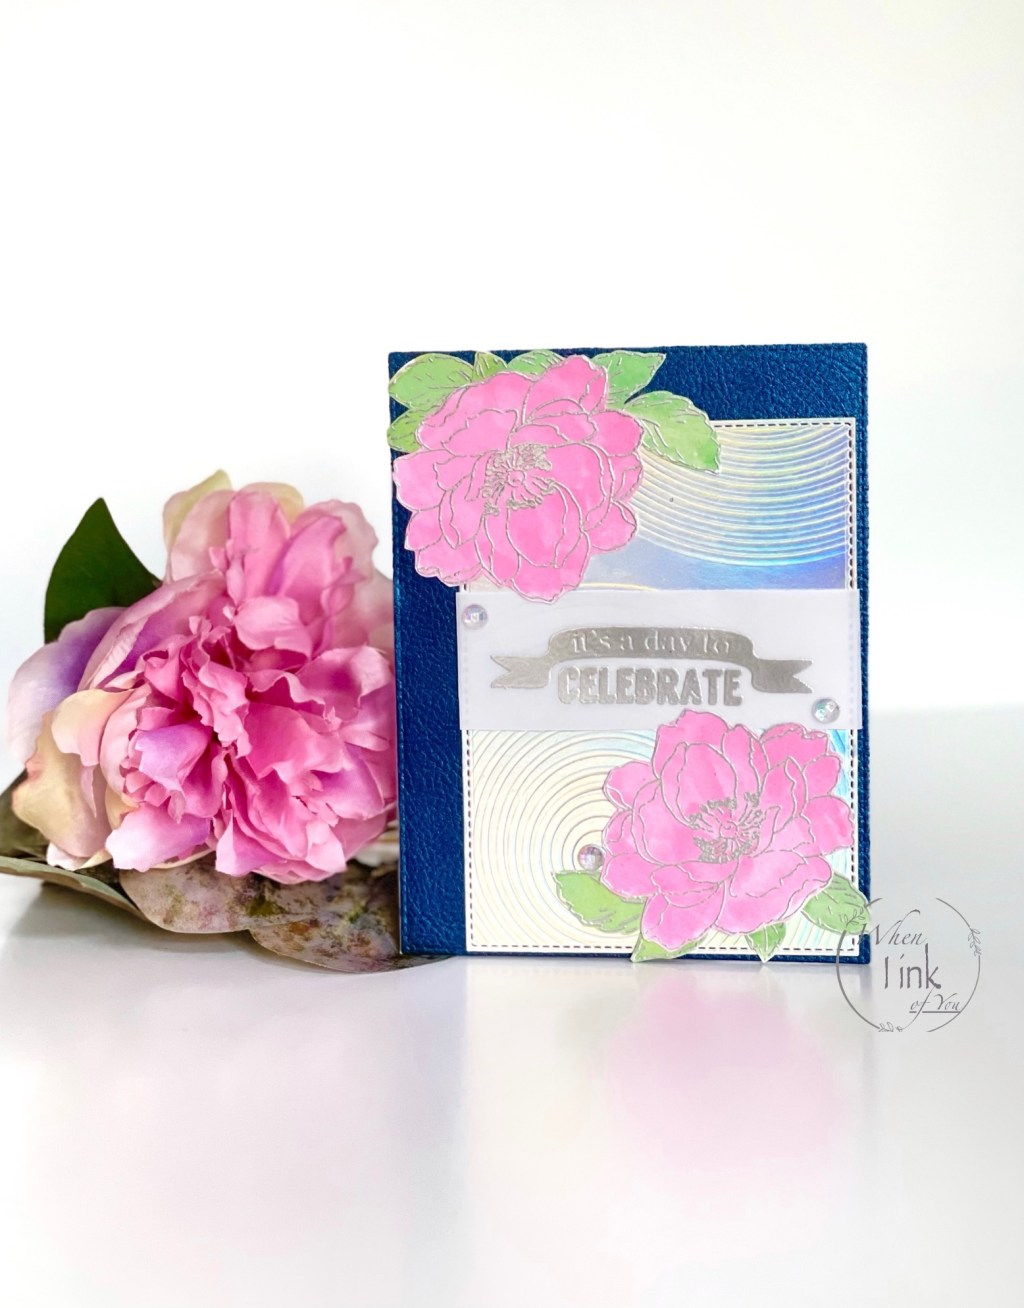
Altenew April 2023 Inspiration Challenge

Hello, everyone! I’m participating in the inspiration challenge for April! Joylita’s color pallette really inspired me. I usually color leaves in gray. I’m not really sure why I shy away from green, so this was a bit out of my comfort zone. I chose my favorite stamp set for this challenge. The Pristine Peonies stamp…
-
Altenew Educators’ “Secret Card Recipe” Blog Hop and Linky Party + Giveaway
Prizes: $130 in total prizes! Altenew is giving away a $20 gift certificate to 3 lucky winners and a $15 gift certificate to 4 winners! To win, please comment on the Altenew Card Blog and/or each designer’s blog post on the blog hop list below by 10/30/2022. There’s MORE! Join our party! We have included an Inlinkz at the Altenew blog for…
-
Lovely Layers Fall Leaves Textured Card
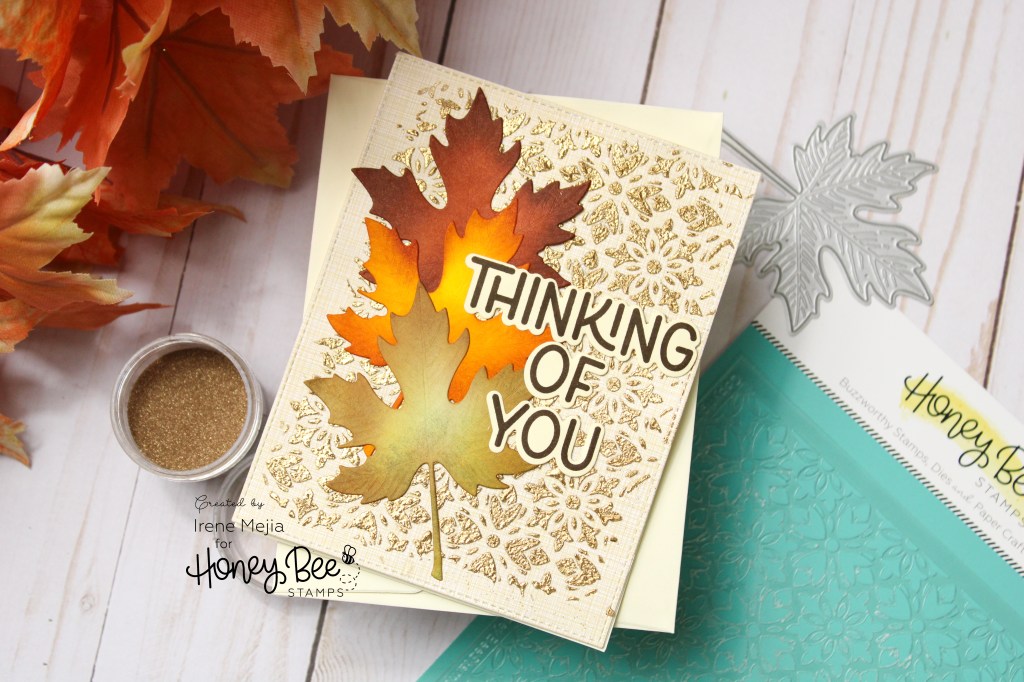
I love a textured card, and especially one with texture that shimmers! I will share the steps to create your own textured card! I began by selecting a patterned paper from Honey Bee Stamps Marvelous Moments 6×8.5 Paper Pad. I chose this pattern because it looks like linen, and its a nice neutral color. I…
-
AECP Final Challenge

In April 2021, I stumbled upon a three-year-old card-making video by the fabulous Jennifer Mcguire. I watched and listened, and she explained the steps to create your beautiful card. At this point, I had never seen a manual die-cutting machine, an embossing folder, or a die-cut. My curious nature and love of learning new things…
-
Favorite Honey Bee Stamps products!

I love Honey Bee Stamp Products! You will find the links to some of my favorites at the bottom of the page.
-
Creative Coloring with Erum-Advaned Techniques

In this class, the fabulous Erum shows advanced techniques to give your cards beautiful details for beautiful results. I created cards with my favorite techniques and tips from this course. Card 1 My first card was inspired by one of my favorite shirts. I began by die-cutting Arches Cold-Press 100% cotton watercolor paper with a…
-
Botanical Illustration Inspired Watercolor

In this class, Jaycee goes over types of watercolor paper, color blending, color lifting, and the use of watercolor for documenting plant species purposes. Card 1 I chose a no-line coloring image from Altenew’s Watercolor Coloring Book for this card and colored the floral images in Shades of Purple from Altenew’s Artist Watercolor 24 Pan…
-
Watercolor 101

The third class in my level three course is Artist Watercolor 101 for Paper Crafters with Emily Midgett. Emily goes over the basics of watercolor, the importance of paper, techniques, and creating swatches. Card 1 I used the Wet to Dry technique on a page from Altenew’s Watercolor Coloring Book for my first card. I used Cherry Blossom for…
-
Transcending Tattoo Techniques

The second course I selected as part of my level three course is Transcending tattoo Techniques. This course is very interesting and has given me techniques I would have never thought of before. Jaycee explains every detail of each style and shares a bit of history for each technique discussed. I highly recommend this class…
-
Stencils Unleashed!

I’m happy to report that I have completed Level 2 of the AECP! It’s official; I am now in Level 3! I have selected the courses for this level, and I will be posting what I create just as before. The first class I will be talking about is Stencils Unleased. Stencils have been tricky…
-
Level 2 Final Challenge

The assignment: Create four masculine cards using birthday, Love/ Thinking of you, Anniversary, and encouragement plus one altered or up cycled item. Card 1 I created the first card for this challenge by combining techniques learned in Stencil Techniques, Impressive heat embossing, and With a Twist! Birthdays are one of my favorite things to celebrate, and…
-
Masking Unleashed
I can’t begin to say how much I enjoyed this class. Svitlana taught me to use making in ways I had never thought of before. Her examples were stunning, and it took a lot not to run out and simply copy what she made! Card 1 One of my favorite lessons in this course uses…
-
Impressive Heat Embossing

I love heat embossing! I love the new ways of using this technique that I learned in this class. Card 1 I chose to use Altenew’s Build-A-Flower Hyacinth Layering Stamp Set for this card. I first stamped the detail layer stamps onto lilac-colored card stock in white embossing powder and set it aside. Then, I…
-
Color Your Day

In this class we learned how to draw inspiration from objects around us, and how to utilize a color wheel when we need a creative boost. Card 1 Card 1 is not a card at all. Instead I chose to make gift tags inspired by my Christmas tree. I have always loved the non-traditional Blue,…
-
Beautiful Details

This class shows you different ways to add beautiful details to your cards. I learned so much, and I very much enjoyed this class. Card 1 For this card, I chose Altenew’s Crocus Build a Flower Layering Stamp Set and Sugar Plums Crisp Dye Ink oval set. I started with the first layer stamp and…
-
Polychromatic
This class shows ways to use many colors on a white background as well as monochromatic color schemes. Card 1 I have been dying to create a black-on-black card. This course was perfect to use this combination. I began by preparing black cardstock with antistatic powder and dusted off the excess with an acrylic block.…
-
Creative Watercolor Media

This class uses re-inkers, inks, and sprays, and turns them into watercolors. Since I do not have re-inkers, sprays or dye inks, I applied the techniques from this class and used a basic watercolor palette. Card 1 I created this card with Altenew’s Statement Flowers Stamp Set. I began by prepping my watercolor paper with…
-
With a Twist!
This class is all about pushing our boundaries. Choosing different colors, using unexpected colors, and mixing modern with vintage are all examples of “With a twist!” Card 1 When I think about roses, I don’t think about black as a color choice. My first choice is always pink or red. So using black dye ink…
-
In The Mood For Color

This course is all about colors and the feelings they evoke. Red, for example, signifies passion and love. Card 1 Green- Soothing, Natural, and GrowthI chose green for my first project. I began by taping Altenew’s Feathery Stencil to white card stock. Next, I blended distress oxide inks in twisted citron, mowed lawn, and lucky…
-
Beyond Basic Backgrounds
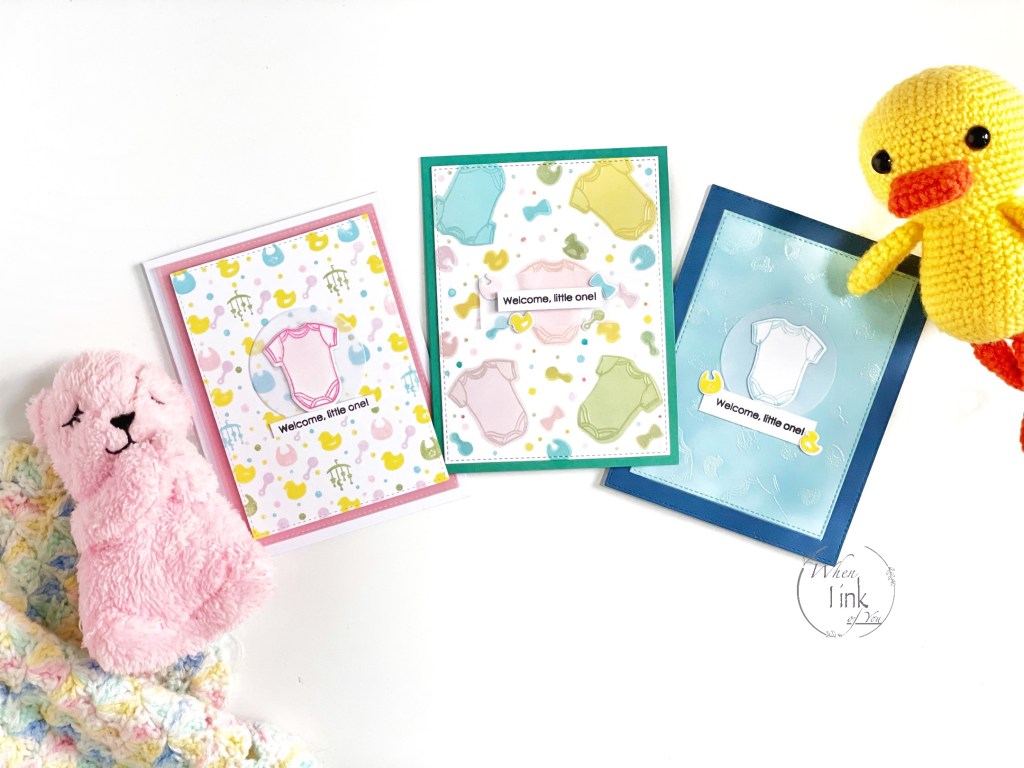
This course is all about creating backgrounds that go beyond basic stamping and it helped me think outside the box. I chose a baby theme for all three cards. Card 1 I began by creating a stencil with the onesie-shaped die. Next, I made five cuts in different directions and created smaller stencils with the…
-
Level 1 complete!
I’m delighted to announce I have completed and passed level 1 of the AECP! I am excited to learn more in level 2 and share it as I go along the course.
-
Level 1 Challenge
It’s challenge time! The mission: Create two sets of cards (one masculine and one feminine) worthy of gifting. Requirements: Use three techniques learned in level one and use recycled material in either the cards or their packaging. Since my family and I are fluent in English and Spanish, I made my card sets bilingual. Set…
-
Irresistible Inking Techniques

This class taught me to think outside the box when it comes to my ink pads. Acrylic block, paintbrushes and brayers can all be used as tools alongside your ink. I made a mess, my hands got extra inky and I had lots of fun! Card 1 I die-cut mint and white card stocks with…
-
Easy Die Cutting Techniques
In this course, I learned of different ways to use die-cutting shapes. Not only can you use them for their intended purpose, however, you can also use them to emboss your projects. I love this technique and the many different ways to stretch your supplies. Card 1 I was eager to try out embossing with…
-
Seasonal Scene Building
This fabulous course is about Scene building! I’ve created cards in the past that I never thought of as scenes. This class helped me see them this way and make them even better. Card 1 Cherry blossom trees are one of my favorite sights of spring and inspired my first card. I began by creating…
-
Stencil Techniques

This class taught me different ways to use stencils and how to use what you have on hand to make your own. I don’t have stencils in my stash, but I do have a couple of frame dies. For this lesson I used my favorite one in different colors to achieve very different results. Card…
-
For The Guys

This course is ALL about creating masculine cards for the special men in our lives. I’m married to a Man’s Man who can fix just about EVERYTHING. No sparkle. No florals. Clean and simple but cool. My husband was my inspiration for the cards I created for these lessons. Card 1 I wanted to keep…
-
Let it Shine!
This course is all about adding SPARKLE! Foil, embossing, glitter, and gems! These are the cards I was inspired to create by this class. Card 1 I began this card by stamping foliage from Altenew’s Vintage Roses Add-On Stamp in clear embossing ink. I then poured gold embossing powder, shook off the excess and heat…
-
Easy Ink Blending Techniques
This class is all about one of my favorite techniques, Ink Blending. I enjoyed learning of different ways of using this technique I had not thought of before. If I don’t have the right colored card stock, I can MAKE one. So simple. So beautiful. Here are the cards I was inspired to create with…
-
Clean and Simple Boutique Cards

This course is all about the beauty in simplicity. I learned how to create simple yet beautiful cards that recipients will love. You can create unique cards in a matter of minutes. Card 1 I created this card using Altenew’s Golden Garden Stamp set. I began by stamping the floral outline using Hickory smoke distressed…
-
All about layering 2

More layering in this course! This class furthered my learning in layering stamp techniques with beautiful stamp sets. Cards 1&2 To begin, I stamped the larger flower cluster stamp from Altenew’s Beautiful Day stamp set on white letter-sized card stock. I used clear embossing ink thought out the entire sheet to create a watermark background. Next, I…
-
All about layering 1

In this course I learned how to use layering stamp sets, lining up their matching points, and selecting colors that compliment one another. These stamp sets help you build beautiful and detailed floral themes that look complicated, yet once learned, are created with ease to let your creativity flow. I’ve created several cards during this…
-
AECP

I came across Altenew when learning about card making. I placed an order with them and was so happy with the quality of product. When I found out about their Educator Certification Program, I decided to apply, and I’m happy to say I was accepted. I will post my course submissions on this blog as…

When I Ink of You…
Expressing love and creativity through ink and paper.
