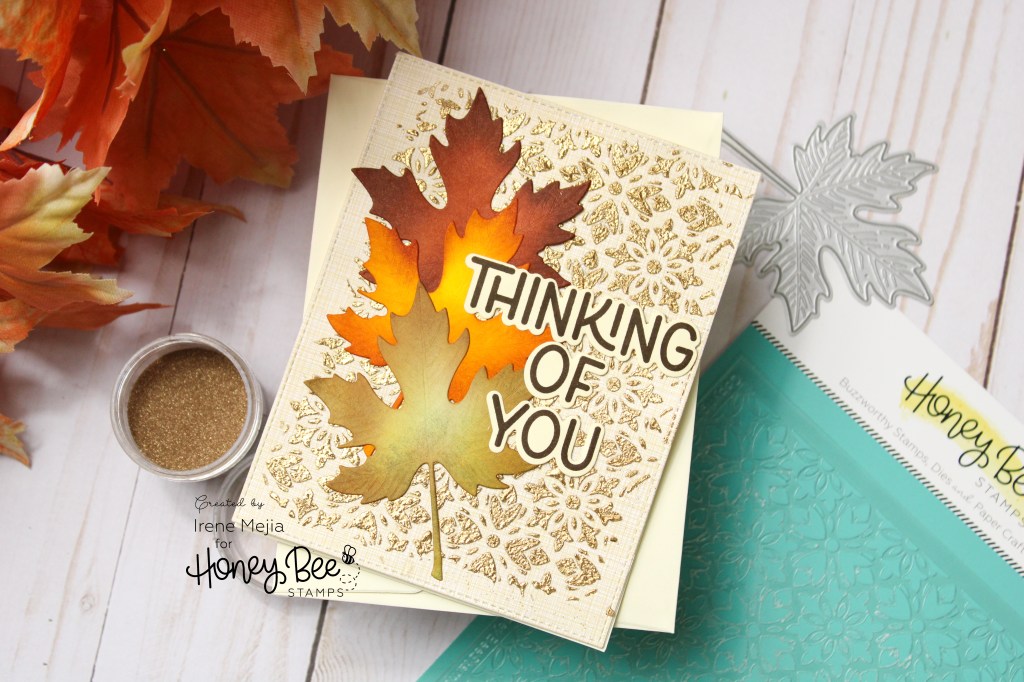
I love a textured card, and especially one with texture that shimmers! I will share the steps to create your own textured card! I began by selecting a patterned paper from Honey Bee Stamps Marvelous Moments 6×8.5 Paper Pad. I chose this pattern because it looks like linen, and its a nice neutral color. I placed my card panel onto my Brutus Monroe Stick and Stamp Mat, and used highlighter Tape told the stencil in place.
Next, I scraped translucent Distress Grit-Paste over the stencil and then poured gold embossing powder over the entire thing. Do not remove the stencil before adding the embossing powder. I do this to avoid having to use anti-static powder. Once the paste is fully coated with powder, carefully remove the stencil, and use a heat gun to set the paste and powder. The embossing paste will bubble as it heats up.
Next, I chose the sentiment “Thinking of You” from the Honey Bee Stamps Fall Foliage Frame Stamp set and stamped it in “Icing on the Cake” Catherine Pooler ink, and I used the coordinating Fall Foliage Frame Die Cuts to cut the sentiment.
The links to the products I used are below. These are affiliate links, so it helps me a lot if you use them to shop at no extra cost!
In this class, the fabulous Erum shows advanced techniques to give your cards beautiful details for beautiful results. I created cards with my favorite techniques and tips from this course.
Card 1
Watercolor drip
My first card was inspired by one of my favorite shirts. I began by die-cutting Arches Cold-Press 100% cotton watercolor paper with a stitched frame die. Next, I stamped Altenew’s Beautiful Day Stamp Set images in clear embossing ink and heat set them with gold embossing powder.
I added color with a detail brush and Artist Watercolor Pan Set. I began to add color to the floral images first. I added a light layer of water first and added pigment in layers, and I did this with each petal individually. Next, I mixed Green Hills and Tropical Forrest in the same manner for the foliage. Once dry, I cut the images with the coordinating dies.
I used one Arteza watercolor pencil in Tumeric Yellow to create the background. I began by adding the highest pigment concentration at the top of the card panel. Next, I added water to the top with a broad brush and held the panel upright to let the water drip. Finally, I added layers of color until I was happy with the look and set it aside to dry.
I first arranged the leaves onto the panel and adhered them with liquid glue. I then placed the flowers over the leaves, one directly onto the leaves and one with foam tape. Finally, I trimmed a few leaves and tucked them in where I liked them best.
I created my second card with 140lb cold press 100% cotton black watercolor paper and Altenew’s Metallic Watercolor Pan Set. I began by preparing the paper with anti-static powder. Next, I placed my paper and stamp into my Misti stamping tool, and stamped the Statement Flowers image in clear embossing ink, and heat set it in gold powder.
I used the wet to dry method to add metallic pigment to the image. I began with Pink Quartz on the open bloom; after it dried, I added Garnet to the edges of the petals. For the closed flower, I used Garnet on the outer petals and rose quartz on the inner side of the petals. For the leaves, I used Jade and Prasiolite.
I added, “With all my love” from Altenew’s Sentiments Strips 2. First, I stamped the sentiment in clear ink and heat set it in gold embossing powder over white card stock. Next, I used Altenew’s Featured Sentiment Die Set to cut the sentiment strip and added it with foam tape. Finally, I added dew drops embellishments to compliment the florals and sentiment.
Next, I stamped Statement Flowers onto white card stock with clear embossing ink and gold embossing powder. I used Copic markers E00 and E93 to add shading to create white flowers. For the flower centers, I used Y2. I lightly added E00 to the leaves as well.
Next, I fussy cut the large flowers and added them to the panel with foam tape. The sentiment “Sending healing hugs” is from sentiment strips 2. I made this one while I made the sentiment for card 2.
In this class, Jaycee goes over types of watercolor paper, color blending, color lifting, and the use of watercolor for documenting plant species purposes.
Card 1
I chose a no-line coloring image from Altenew’s Watercolor Coloring Book for this card and colored the floral images in Shades of Purple from Altenew’s Artist Watercolor 24 Pan Set. I used the wet-on-wet technique to lightly color the petals first. Then, I dried and added pigment along the inside of the petals in layers.
For the Foliage, I used Rock Collection to color and shade the images. Once the panel air dried, I darkened the foliage veins and partially shaded the florals with a colored pencil.
I heat embossed “If friends were flowers, I’d pick you” from HoneyBee stamps in silver embossing powder and attached it with black foam tape. Finally, I added silver sequins to compliment the sentiment.
“Card” 2
I began with another no-line coloring image from my coloring book for my second card and used the wet-on-wet technique to layer color onto my canvas. I first colored the petals in Cherry Blossom. Next, I darkened the inside of the petals in multiple layers and used the smallest brush from my Detailed Brush Set to add veins to each petal in small thin strokes. Then, I colored the center in Pockey full of sunshine and Summer Afternoon.
I colored the foliage and stems in Rain Forest first; once dry, I added Tropical Forest along the vein lines and lifted the pigment to give an illusion of light. I also used a white gel pen to add highlights to the edge of the petals.
I decided to frame this piece instead. I mounted it onto pink card stock to put into a gallery frame at a later time. This will be a gift for a dear friend.
“Card” 3
I picked up a couple of small frames while shopping. I thought they would make a lovely gift.
I began by stamping an image from Altenew’s Mini Hibiscus Tea Stamp Set in waterproof black ink onto Arches 100 % Cotton Cold Press Watercolor Paper. Then, I let the ink dry and began to paint the teacup in a mix of Summer Afternoon and Pocket Full of Sunshine. Next, I painted the hibiscus flowers in Red Cosmos and Cherry Blossom. Finally, I used Green Meadows and Green Hills for the foliage images.
I used the Wet to Dry technique on a page from Altenew’s Watercolor Coloring Book for my first card. I used Cherry Blossom for the petals, Pocket Full of Sunshine for the center, Green Hills, and Rain Forest for the stem and leaves. The colors I used are from Altenew’s Artists Watercolor 24 pan set. I added a concentration of color to the inside of the petals where the shading would be darkest and pulled the stain towards the edges with clean water. I used Altenew’s Detailed brush set, making it easier to color small areas. For the leaves, I added Rain Forest to the entire area first and mixed the two green shades to add shading to the underside of the leaves and the top of the stem.
Once the page was dry, I stamped “You are the Best” from Altenew’s Paint-A-Flower: Zinnia Magellan Rose. I added the reflections dew drops to compliment the sentiment.
Card 2
I used the Wet on Wet Technique on watercolor paper for my second card. I added Shades of Purple, Cherry Blossom, and Tea Party to create the background. Once dry, I stamped, and heat embossed the Zinnia Magellan Rose image in gold embossing powder. I added color to the floral along the color lines of the background to avoid a muddy mess. Next, I watercolored the leaves with a mix of Rain Forest and Green Hills. I added color until I was content with the look and added ink spatters in the same colors. Once dry, I added a Simon Says Stamp sentiment and sequins for added detail.
Card 3 “White Flower”
Card 3
For my third card, I chose to create a white flower. I first colored the background from my coloring book. I first used Cherry Blossom and then Shades of Purple. Next, I used my heat gun to dry the panel between layers. To create a white flower, you must add more color than you think. I used Fall Harvest to paint the “white” flower and added more color to the center and under the petals. I used the wet-on-wet technique to achieve this. Next, I used a mixture of Tropical Forest and Green Meadows to paint the leaves. Finally, I added paint spatter with Rock Collection (also found in the Artist Pan Set).
I added a thin frame with a T-Ruler and Fine Liner Pen and “Celebrating you today” from Altenew’s Sentiment Strip 2 Set with foam tape. Finally, I added sequins for a touch of sparkle.
I’m happy to report that I have completed Level 2 of the AECP! It’s official; I am now in Level 3! I have selected the courses for this level, and I will be posting what I create just as before. The first class I will be talking about is Stencils Unleased. Stencils have been tricky for me as I’m never quite sure how to work with their results. I often feel they are too busy, and I find myself having difficulty using a very detailed background. This class has helped very much in my case. I learned ways to use stencils I had not thought of before. I hope you enjoy what I made!
Card 1
I chose to begin with the Altenew Leaf Bed Stencil. First, I sprayed the back with pixie spray and placed it over watercolor paper. Next, I grabbed a color pencil and a metal scrapper and began to distribute shavings over the stenciled area. Then, I used a misting spray with water to let the watercolor work its magic. I chose several green and a couple of yellow shades and repeated the process several times. Finally, I set the piece aside to dry.
I secured the black and white floral elements to the center with liquid adhesive. Next, I used foam squares for the butterfly and sentiment and added the piece to green card stock. Once the work was attached to an A2-sized card, I added green gem embellishments for a bit of sparkle.
Card 2
For this peek-a-boo card, I chose Elegant Swirls Stencil. I’ve had this one for a while but have been hesitant to use it before. I used Pixie Spray to secure this stencil to Neenah Solar card stock. Next, I blended Distress Oxide Inks in Seedless Preserves and Wilted Violet over the stencil. Next, I brushed Perfect Pearls in gold in a few areas before the ink had thoroughly dried and removed the stencil. Once the ink was dry, I began shading the lower lines and curves of the swirls with a black colored pencil.
I cut along the large curve of the stenciled image and out of a white notecard. Next, I die-cut “Hello” in black, purple, and white using Altenew’s Fancy Hello Die. For a seamless look on the inside, I glued the white “Hello” on top of the notecard first and then added the inked panel. Next, I added the purple hello directly to the white and offset the stacked black hellos. Finally, I added three black gems in a triangular pattern for sparkle.
The assignment: Create four masculine cards using birthday, Love/ Thinking of you, Anniversary, and encouragement plus one altered or up cycled item.
Card 1
I created the first card for this challenge by combining techniques learned in Stencil Techniques, Impressive heat embossing, and With a Twist!
Birthdays are one of my favorite things to celebrate, and I wanted to make a fun, masculine card. I love interactive cards and chose to create a shaker card.
I used Altenew’s Honeycomb Stencil, an ink dauber and clear embossing ink to generously ink the area without moving the stencil. Then, I carefully lifted the stencil, poured gold embossing powder, shook off the excess and heat set the powder, and set it aside to cool.
I trimmed a 5 x 7 size card storage bag and placed my card panel face down. I used a tape runner on the back and folded the edges of the storage bag on three sides, then I poured specialty gold glitter and sequins into the pocket and sealed the top. Finally, I trimmed any excess cellophane for an even seal.
Next, I placed “happy birthday to you” on the front of the shaker card panel with strong double-sided tape. I then attached the completed panel to a navy-colored note card.
Card 2
I combined All About Layering, Masking unleashed, and Impressive Heat Embossing techniques to create this Bride and Groom Anniversary-themed card.
I began by using a T-Ruler to find the center of the card and masked the right-hand side of my panel with post-it notes. Next, I placed the panel in my Misti and stamped the bow tie image from the “thanks dad” stamp set. Next, I stamped the image ink-black dye ink using the second-generation stamping technique. I then stamped the detail portion multiple times in the same ink. I then masked the left side with the bow tie image.
Next, I used a black pigment ink pad to generously cover the right side in black ink and set it aside to dry. Once dry, I prepared the panel with anti-static powder, stamped an outline image from Vintage Flowers in white pigment ink, and heat set white embossing powder over the image. I added “Happy Anniversary” from the Vintage Roses stamp set by first stamping in black, then the right portion in white pigment ink.
Card 3
For this Encouragement theme card, I combined Ink Blending, Masking Unleashed, and Color Your Day techniques.
I began with a white card panel I taped down with Washi tape. My initial idea was to create a square shape, but I changed my mind while masking and created a hexagon instead. I selected the split complementary colors of Blue-violet for this card using my color wheel. Next, I blended distress oxide ink in Prize ribbon at the top, carved pumpkin for the center, and squeezed lemon for the bottom.
I placed the panel into my Misti, used the second layer leaf stamp of Angelique Motifs in jet black dye ink, and stamped it multiple times to get an even and dark image. I then stamped “Sometimes you win, sometimes you learn, Never give up” from Altenew’s A Walk in the Woods stamp set. Once dry, I attached my panel to a white notecard with strong double-sided tape.
Card 4
I created this Love-themed card using Stencil Techniques, Easy Die Cutting Techniques, and Impressive Heat Embossing.
I began by foiling 100lbs black card stock with Altenew’s Golden Days hot foil plate and silver foil. I then prepared the surface with anti-static powder and inked the third layer of the Golden Days simple coloring stencil set clear embossing ink. Next, I heat set black embossing powder over it and set it aside.
Next, I used Circled Greetings Love Die and cut it 6 times in black, once in silver, and once in red. I l stacked the black layers and glued them with liquid adhesive. I added the silver cut at the back slightly to the left to complement the silver foil of the floral image and the red cut on top and slightly to the right to create a dimensional and shadowed stacked sentiment.
I stamped the small “you” from the Paint a flower Camellia Waterhouse stamp set in red pigment ink and secured the die-cut onto the panel with liquid adhesive. Finally, I attached the completed panel to a white notecard with strong double-sided tape.
Altered/ Upcycled item
I combined Impressive Heat Embossing, Easy Die Cutting Techniques, and Easy Ink Blending Techniques for this project.
Paper Rose Topiary
For this project, I wanted to give new life to a terra cotta pot I have had sitting around in my garage after my many, many, MANY failed attempts at gardening. If anyone reading this can make lovely things grow from seeds, I envy your talents as I clearly do not possess a green thumb. (HAHA!) I used the terra cotta pot, skewers from my kitchen, 2.9-inch styrofoam spheres, floral tape, and metallic acrylic paint leftover from a project I made last year.
I taped the pot’s rim with Washi tape and painted the pot with a paintbrush. Next, I did 2 layers of metallic white pearl acrylic paint. Once the paint was dry, I removed the Washi tape from the rim and inked it in clear embossing ink. Next, I poured gold embossing powder over the edge generously, and heat set it. I repeated until the pot’s rim was covered entirely in embossing powder. Next, I stamped the small bouquet image from Altenew’s beautiful Day stamp set in white pigment ink twice. I covered the ink in gold embossing powder and heat set it. I stamped this image twice and heat set it in gold embossing powder. I repeated the process with a smaller image from the same stamp set.
I created multiple roses (24-36, I did not keep count) in white, light, and medium pink card stocks, with Altenew’s Mini Rolled Roses Die Set. I also cut several leaves in two shades of green with the leaf die cuts from this set. I inked the edges of the rose cuts with oxide inks ink picked raspberries, and worn lipstick. I began to roll each rose with reverse tweezers and secured them with hot glue. Next, I rolled the edges of each petal using the end of a small paintbrush. Finally, I set the flowers aside. I trimmed 3 wooden skewers, wrapped them in brown floral tape, and attached the bottom and top of the skewers together with floral tape.
I inserted the skewers into a (previously cut) half foam sphere and into a whole sphere at the top. Then, I secured them with hot glue. I added the paper roses with hot glue at the bottom of each rose, making sure the colors were evenly dispersed. Next, I added leaves in-between the roses as needed and attached them with hot glue. Finally, I painted the half-sphere with a Copic marker and covered it in liquid glue and transparent glitter.
I attached the half-sphere into the pot with hot glue. I wanted a mossy or grassy look at the bottom of the topiary without purchasing anything new. So I took what was left from the green card stock, ran it through my paper shredder, and sprinkled it around the bottom. I added a pink satin ribbon to the branches made with the skewers and secured it with hot glue for a final touch.
I can’t begin to say how much I enjoyed this class. Svitlana taught me to use making in ways I had never thought of before. Her examples were stunning, and it took a lot not to run out and simply copy what she made!
Card 1
One of my favorite lessons in this course uses masking to give die cuts a more exciting look. For my first project, I used Altenew’s Rose Queen Die Set. I’ve had it in my stash for a while, and I wasn’t sure what I wanted to do with it until now.
I first created a mask with a masking sheet and large die in the rose queen set. I removed the negative pieces carefully and pressed the mask onto white card stock. I also masked the area around the image to ensure no smudges were left. ( I am not a careful crafter LOL) I ran the card stock with the masking sheets through my die cutter so the mask would stay put. Once all pieces were put in their place, I began ink blending. I started with picked raspberries, then wilted violet, prized ribbon, and black soot distress oxide inks. I added white paint spatter with white pigment ink and a paintbrush for a starry night sky look.
I removed the masks from my project.
Next, I placed double-sided tape behind black card stock ( This is an invaluable tip I learned in this class and has made things much easier, LOL) and cut the large image again. I carefully removed the tape backing from the cut, lined it with the inked image, and pressed on. Finally, I cut my project to A2 size with a stitched frame die cut.
Now that Christmas is over, I wanted to make a card that was Valentine’s Day themed. I started with cutting masking sheets several times using the small florals from the Rose Queen Die Set. I Placed a few over white card stock and began to blend candied apple distress oxide ink. I added a few more masks and blended another layer of ink. I repeated the process one last time, and once the ink was dry, I used Altenew’s Antique Gold ink Spray generously over my project. I removed the masks once the gold ink dried. I used an A2-sized frame to cut out a portion of my sheet.
Antique Gold Ink Spray
I added a thin strip of white card stock towards the bottom and one gold strip cut at an angle under it. Next, I added “love” die cuts and a couple of small rose queen cuts in gold for a final touch.
I love heat embossing! I love the new ways of using this technique that I learned in this class.
Card 1
I chose to use Altenew’s Build-A-Flower Hyacinth Layering Stamp Set for this card. I first stamped the detail layer stamps onto lilac-colored card stock in white embossing powder and set it aside. Then, I began to layer the flower on white card stock using Altenew’s SugarPlums Crisp Dye Ink Set. I used Pale Mauve, Amethyst, and Grape Agate. Finally, I used Momento dew drop ink for the foliage and stem in new sprout and cottage ivy.
I cut a small portion of my full-color flower at an angle. Next, I aligned it with the white flower and attached it with foam tape. Next, I die cut “hello” using Altenew’s Fancy Hello Die once in matte gold and twice in white, then stacked them with liquid glue. Next, I cut a thin strip in the same matte gold and adhered it near the right edge with double-sided tape. To finish, I added this piece to a purple notecard.
Card 2
I created this card using the layered heat embossing technique. I once again used the Hyacinth Layering Stamp Set. I stamped the foliage base and the fine detail floral stamp in pearl embossing powder. I added gold embossing using a clear embossing pen over the heat set pearl embossing.
I blended Crisp Dye ink in Plum around the edges and the lower right side of my project. Next, I cut “hello‘ and used one die cut as a mask to blend the ink. Once the blending was complete, I used the clear embossing in pen to outline “hello,” and heat set it in gold powder. I next attached a stacked hello with liquid glue.
I attached my project to a lilac-colored notecard with double-sided tape.
Card 3
I created card three by prepping purple and black card stocks with anti-static powder. Then, using my Misti stamping tool, I arranged stamps from Altenew’s Elegant Motifs Stamp Set and pressed them onto both card stocks in clear embossing ink. I then poured gold embossing powder and heat set it. Next, I cut the card stocks together at an angle. I chose two of the cuts, aligned them, and used Washi tape to secure them together at the back of the paper. Next, I cut a thin strip of matte gold card stock and adhered it to the diagonal cut. Finally, I added “hello” in matte gold with a black cut offset behind it and placed it alongside the strip.
In this class we learned how to draw inspiration from objects around us, and how to utilize a color wheel when we need a creative boost.
Card 1
Card 1 is not a card at all. Instead I chose to make gift tags inspired by my Christmas tree. I have always loved the non-traditional Blue, silver and pearl ornaments I first purchased back in 2005, for my husband and I’s first Christmas. However, my color scheme is not always easy to find in decor or wrapping.
I have a confession… I am not a member of the blue flower fan club. I don’t gravitate towards them when creating despite having a few blue poinsettias displayed on my tree. I went against my usual rule for these tags. I began with Altenew’s Build-a-Flower Poinsettia Layering Stamp and Die Set. I chose momento dew drop ink in summer sky for all the poinsettia layers. I began with the base, then the mid detail stamp, and finally the fine detail. I skipped the outline layer entirely as I did not want harsh lines. instead, I added detail with a colored pencil and white gel pen. I used Altenew’s Crisp Dye Ink in Butternut and Pumpkin Pie for the center of the flower. I added Stickles in diamond over the center for a bit of sparkle.
I cut tag shapes with Altenew’s Terrific Tags Die Set. I used blue card stock for the larger portion and white for the smaller. I stamped “For You” included with the poinsettia stamp set in summer sky. I cut thin silver glitter card stock strips and used them to border the white tag. I then attached the white tag to the blue with foam tape. I attached the poinsettia with double-sided tape and foam tape where needed. For a final touch of sparkle, I added iridescent beads. Finally, I added a white satin ribbon to hang my tags onto wrapped gifts.
Card 2
I created a second also drawn from inspiration. While shopping for blue wrapping paper, I came across luxury black wrapping paper rolls. Red and yellow, or in this case, gold, are complimentary and part of a triad in the color wheel.
I began by using Altenew’s Slim Botanical 3D Embossing Folder and white card stock. Next, I cut my embossed paper with a tag shape from Altenew’s Terrific tags. Next, I added black foam tape to the back and set it aside. I then taped Altenew’s Leaves and Berries Stencil onto black card stock and blended watermark ink over the stencil. Once dry, I attached the embossed tag onto the right side of the black card stock. Next, I cut red and red glitter card stock into strips and used double-sided tape to attach them to the card. Next, I cut “Joy” in matte gold foil card stock and used foam tape to attach the letter over the red strips.