Creative Coloring with Erum-Advaned Techniques

In this class, the fabulous Erum shows advanced techniques to give your cards beautiful details for beautiful results. I created cards with my favorite techniques and tips from this course.

Card 1

Watercolor drip

My first card was inspired by one of my favorite shirts. I began by die-cutting Arches Cold-Press 100% cotton watercolor paper with a stitched frame die. Next, I stamped Altenew’s Beautiful Day Stamp Set images in clear embossing ink and heat set them with gold embossing powder.


I added color with a detail brush and Artist Watercolor Pan Set. I began to add color to the floral images first. I added a light layer of water first and added pigment in layers, and I did this with each petal individually. Next, I mixed Green Hills and Tropical Forrest in the same manner for the foliage. Once dry, I cut the images with the coordinating dies.


I used one Arteza watercolor pencil in Tumeric Yellow to create the background. I began by adding the highest pigment concentration at the top of the card panel. Next, I added water to the top with a broad brush and held the panel upright to let the water drip. Finally, I added layers of color until I was happy with the look and set it aside to dry.


I first arranged the leaves onto the panel and adhered them with liquid glue. I then placed the flowers over the leaves, one directly onto the leaves and one with foam tape. Finally, I trimmed a few leaves and tucked them in where I liked them best.


Finally, I added the sentiment from Altenew’s Extra Special Stamp Set in jet black ink.

Card 2

I created my second card with 140lb cold press 100% cotton black watercolor paper and Altenew’s Metallic Watercolor Pan Set. I began by preparing the paper with anti-static powder. Next, I placed my paper and stamp into my Misti stamping tool, and stamped the Statement Flowers image in clear embossing ink, and heat set it in gold powder. 

I used the wet to dry method to add metallic pigment to the image. I began with Pink Quartz on the open bloom; after it dried, I added Garnet to the edges of the petals. For the closed flower, I used Garnet on the outer petals and rose quartz on the inner side of the petals. For the leaves, I used Jade and Prasiolite.

I added, “With all my love” from Altenew’s Sentiments Strips 2. First, I stamped the sentiment in clear ink and heat set it in gold embossing powder over white card stock. Next, I used Altenew’s Featured Sentiment Die Set to cut the sentiment strip and added it with foam tape. Finally, I added dew drops embellishments to compliment the florals and sentiment.

Card 3

For my final card, I used Altenew’s Elegant Swirls Stencil and embossing paste over pink card stock; before it dried, I added gold embossing powder and heat set it. 

Next, I stamped Statement Flowers onto white card stock with clear embossing ink and gold embossing powder. I used Copic markers E00 and E93 to add shading to create white flowers. For the flower centers, I used Y2. I lightly added E00 to the leaves as well.

Next, I fussy cut the large flowers and added them to the panel with foam tape. The sentiment “Sending healing hugs” is from sentiment strips 2. I made this one while I made the sentiment for card 2.

Advertisement

Watercolor 101

The third class in my level three course is Artist Watercolor 101 for Paper Crafters with Emily Midgett. Emily goes over the basics of watercolor, the importance of paper, techniques, and creating swatches. 

Card 1

I used the Wet to Dry technique on a page from Altenew’s Watercolor Coloring Book for my first card. I used Cherry Blossom for the petals, Pocket Full of Sunshine for the center, Green Hills, and Rain Forest for the stem and leaves. The colors I used are from  Altenew’s Artists Watercolor 24 pan set. I added a concentration of color to the inside of the petals where the shading would be darkest and pulled the stain towards the edges with clean water. I used Altenew’s Detailed brush set, making it easier to color small areas. For the leaves, I added Rain Forest to the entire area first and mixed the two green shades to add shading to the underside of the leaves and the top of the stem.

Once the page was dry, I stamped “You are the Best” from Altenew’s Paint-A-Flower: Zinnia Magellan Rose. I added the reflections dew drops to compliment the sentiment.

Card 2

I used the Wet on Wet Technique on watercolor paper for my second card. I added Shades of Purple, Cherry Blossom, and Tea Party to create the background. Once dry, I stamped, and heat embossed the Zinnia Magellan Rose image in gold embossing powder. I added color to the floral along the color lines of the background to avoid a muddy mess. Next, I watercolored the leaves with a mix of Rain Forest and Green Hills. I added color until I was content with the look and added ink spatters in the same colors.
Once dry, I added a Simon Says Stamp sentiment and sequins for added detail.

Card 3 “White Flower”

Card 3

For my third card, I chose to create a white flower. I first colored the background from my coloring book. I first used Cherry Blossom and then Shades of Purple. Next, I used my heat gun to dry the panel between layers. To create a white flower, you must add more color than you think. I used Fall Harvest to paint the “white” flower and added more color to the center and under the petals. I used the wet-on-wet technique to achieve this. Next, I used a mixture of Tropical Forest and Green Meadows to paint the leaves. Finally, I added paint spatter with Rock Collection (also found in the Artist Pan Set).

I added a thin frame with a T-Ruler and Fine Liner Pen and “Celebrating you today” from Altenew’s Sentiment Strip 2 Set with foam tape. Finally, I added sequins for a touch of sparkle.

Stencils Unleashed!

I’m happy to report that I have completed Level 2 of the AECP! It’s official; I am now in Level 3! I have selected the courses for this level, and I will be posting what I create just as before. The first class I will be talking about is Stencils Unleased. Stencils have been tricky for me as I’m never quite sure how to work with their results. I often feel they are too busy, and I find myself having difficulty using a very detailed background. This class has helped very much in my case. I learned ways to use stencils I had not thought of before. I hope you enjoy what I made!

Card 1

I chose to begin with the Altenew Leaf Bed Stencil. First, I sprayed the back with pixie spray and placed it over watercolor paper. Next, I grabbed a color pencil and a metal scrapper and began to distribute shavings over the stenciled area. Then, I used a misting spray with water to let the watercolor work its magic. I chose several green and a couple of yellow shades and repeated the process several times. Finally, I set the piece aside to dry.


For card centerpiece, I used Altenew’s Beautiful Day Stamp and Die set (a favorite of mine) and the SugarPlums Oval Dyes Ink set. The butterfly was created with Dovetail Butterflies Layered Stamp Set and Dies and Drew Drop Memento Inks in Dandelion and Cantaloupe. The sentiment is from Sentiment Strips 2.

I secured the black and white floral elements to the center with liquid adhesive. Next, I used foam squares for the butterfly and sentiment and added the piece to green card stock. Once the work was attached to an A2-sized card, I added green gem embellishments for a bit of sparkle.

Card 2

For this peek-a-boo card, I chose Elegant Swirls Stencil. I’ve had this one for a while but have been hesitant to use it before. I used Pixie Spray to secure this stencil to Neenah Solar card stock. Next, I blended Distress Oxide Inks in Seedless Preserves and Wilted Violet over the stencil. Next, I brushed Perfect Pearls in gold in a few areas before the ink had thoroughly dried and removed the stencil. Once the ink was dry, I began shading the lower lines and curves of the swirls with a black colored pencil.

I cut along the large curve of the stenciled image and out of a white notecard. Next, I die-cut “Hello” in black, purple, and white using Altenew’s Fancy Hello Die. For a seamless look on the inside, I glued the white “Hello” on top of the notecard first and then added the inked panel. Next, I added the purple hello directly to the white and offset the stacked black hellos. Finally, I added three black gems in a triangular pattern for sparkle.

Masking Unleashed

I can’t begin to say how much I enjoyed this class. Svitlana taught me to use making in ways I had never thought of before. Her examples were stunning, and it took a lot not to run out and simply copy what she made!

Card 1

One of my favorite lessons in this course uses masking to give die cuts a more exciting look. For my first project, I used Altenew’s Rose Queen Die Set. I’ve had it in my stash for a while, and I wasn’t sure what I wanted to do with it until now.


I first created a mask with a masking sheet and large die in the rose queen set. I removed the negative pieces carefully and pressed the mask onto white card stock. I also masked the area around the image to ensure no smudges were left. ( I am not a careful crafter LOL) I ran the card stock with the masking sheets through my die cutter so the mask would stay put. Once all pieces were put in their place, I began ink blending. I started with picked raspberries, then wilted violet, prized ribbon, and black soot distress oxide inks. I added white paint spatter with white pigment ink and a paintbrush for a starry night sky look.


I removed the masks from my project.


Next, I placed double-sided tape behind black card stock ( This is an invaluable tip I learned in this class and has made things much easier, LOL) and cut the large image again. I carefully removed the tape backing from the cut, lined it with the inked image, and pressed on. Finally, I cut my project to A2 size with a stitched frame die cut.


I added “So many Smiles begin with you” from Altenew’s Paint-A-Flower Himalayan Poppy stamp set in black dye ink.

Card 2

Now that Christmas is over, I wanted to make a card that was Valentine’s Day themed. I started with cutting masking sheets several times using the small florals from the Rose Queen Die Set. I Placed a few over white card stock and began to blend candied apple distress oxide ink. I added a few more masks and blended another layer of ink. I repeated the process one last time, and once the ink was dry, I used Altenew’s Antique Gold ink Spray generously over my project. I removed the masks once the gold ink dried. I used an A2-sized frame to cut out a portion of my sheet.

Antique Gold Ink Spray


I added a thin strip of white card stock towards the bottom and one gold strip cut at an angle under it. Next, I added “love” die cuts and a couple of small rose queen cuts in gold for a final touch.

Impressive Heat Embossing

I love heat embossing! I love the new ways of using this technique that I learned in this class.

Card 1

I chose to use Altenew’s Build-A-Flower Hyacinth Layering Stamp Set for this card. I first stamped the detail layer stamps onto lilac-colored card stock in white embossing powder and set it aside. Then, I began to layer the flower on white card stock using Altenew’s SugarPlums Crisp Dye Ink Set. I used Pale Mauve, Amethyst, and Grape Agate. Finally, I used Momento dew drop ink for the foliage and stem in new sprout and cottage ivy.

I cut a small portion of my full-color flower at an angle. Next, I aligned it with the white flower and attached it with foam tape. Next, I die cut “hello” using Altenew’s Fancy Hello Die once in matte gold and twice in white, then stacked them with liquid glue. Next, I cut a thin strip in the same matte gold and adhered it near the right edge with double-sided tape. To finish, I added this piece to a purple notecard.

Card 2

I created this card using the layered heat embossing technique. I once again used the Hyacinth Layering Stamp Set. I stamped the foliage base and the fine detail floral stamp in pearl embossing powder. I added gold embossing using a clear embossing pen over the heat set pearl embossing.

I blended Crisp Dye ink in Plum around the edges and the lower right side of my project. Next, I cut “hello‘ and used one die cut as a mask to blend the ink. Once the blending was complete, I used the clear embossing in pen to outline “hello,” and heat set it in gold powder. I next attached a stacked hello with liquid glue.

I attached my project to a lilac-colored notecard with double-sided tape.

Card 3

I created card three by prepping purple and black card stocks with anti-static powder. Then, using my Misti stamping tool, I arranged stamps from Altenew’s Elegant Motifs Stamp Set and pressed them onto both card stocks in clear embossing ink. I then poured gold embossing powder and heat set it. Next, I cut the card stocks together at an angle. I chose two of the cuts, aligned them, and used Washi tape to secure them together at the back of the paper. Next, I cut a thin strip of matte gold card stock and adhered it to the diagonal cut. Finally, I added “hello” in matte gold with a black cut offset behind it and placed it alongside the strip.

Beautiful Details

This class shows you different ways to add beautiful details to your cards. I learned so much, and I very much enjoyed this class.

Card 1

For this card, I chose Altenew’s Crocus Build a Flower Layering Stamp Set and Sugar Plums Crisp Dye Ink oval set. I started with the first layer stamp and Pale Mauve ink. For the second layer, I used amethyst and grape agate for the detail stamp. I masked the first flower to create a second. I made two additional masks and added darker flowers behind the first two. For the darker flowers, I used amethyst for the first layer, grape agate for the second, and plum for the third.

I used gel pens in white and dark purple to add details to the petals. I sparingly used a black felt tip pen to add smaller shadows and lines.

I used gel pens in white and dark purple to add details to the petals. I sparingly used a black felt tip pen to add smaller shadows and lines.

I added ink splatter by pressing an ink pad onto an acrylic block, spritzing water on the ink, and dipping a small brush in the mixture.

I used a stitched frame die to cut my project. The sentiment is from Altenew’s Paint-A-Flower: Rosa Floribunda Outline Stamp Set. I then added reflections dew drops for a bit of sparkle.

I secured my piece to a lavender-colored background and attached it to a blank notecard.

Card 2

I began with Altenew’s statement flowers Stamp. It’s simply beautiful and has quickly become a favorite of mine. I stamped it in memento Angel Pink ink. The color is very light and lends itself to creating “no-line coloring.”

I used Copic Ciao RV21 for the base coloring and a bit of shadowing with R32. For the leaves, I used YG11 in the centers only. The center of the flower was colored with Y21.

I added details to the image with Faber-Castell colored pencils. I added dark pink detailing with #125. I wanted to keep my colors warm, so I opted to shade with browns rather than grays. I generously used colors 187 and 176 to paint the center of the flower, petals, and leaves. To add highlights, I used a white gel pen.

I wanted to keep the floral as the main focus, so I added a small “thanks a bunch” from Altenew’s Many Thanks Stamp Set in gold Embossing powder. For sparkle, I added gold leaf specialty glitter.

Card 3

I wanted to create a detailed image with something other than flowers, so I chose Altenew’s Bird of the Woods Stamp and Die Bundle.

I began this project by stamping the outline image first in black dye ink. I used distress oxide inks in Tumbled Glass, Salty Ocean, and Prized Ribbon for the plumage layers. I have a pet budgie, and these colors are very similar to his. Budgies have white feathers at the top of their head as they age, which is why I chose to leave this one white.

I used Faber-Castell (blues) #120 and #147 and Prismacolor 1067 and 1065 (grays) pencils to add details to his feathers.

I stamped the branches in memento London fog ink and filled in shadows and small details with Prismacolor 1056. I used the coordinating dies to cut the images out.

I created the background by blending distress oxide ink in Stormy Sky onto white card stock. I mixed white pigment ink and water to add the appearance of delicate white snow. I also used Altenew’s antique silver ink spray to add a few dark specks. Once the ink was dry, I added a Thank You sentiment from Altenew’s Many Thanks Stamp Set in blue embossing powder.

I arranged the branches and adhered one with foam tape and the other flat with liquid glue. I attached the bird with foam tape. I completed my card by attaching my piece to a blue notecard with double-sided tape.

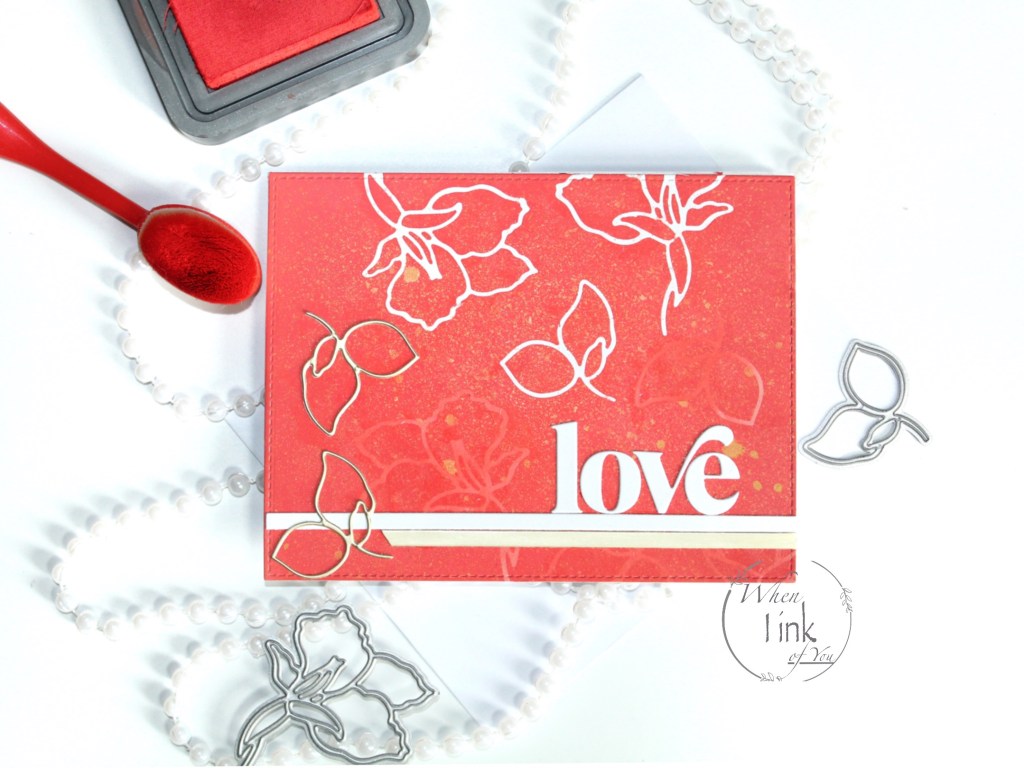
In The Mood For Color

This course is all about colors and the feelings they evoke. Red, for example, signifies passion and love.

Card 1

Green- Soothing, Natural and Growth

Green- Soothing, Natural, and Growth
I chose green for my first project. I began by taping Altenew’s Feathery Stencil to white card stock. Next, I blended distress oxide inks in twisted citron, mowed lawn, and lucky clover. Once the ink was dry, I used a stitched die cut it slightly smaller than A2 size.


I added a gold glitter card stock strip to the center with double-sided tape. Next, I added a lightly inked circle to the center with foam tape. For the sentiment, I used Altenew’s fancy “for you” die. I cut it several times using white card stock and once in green. Finally, I used liquid glue to stack them and attach them.

Card 2

Yellow-Energy, Cheer, and Optimism

I stamped the floral outline stamp from Altenew’s Beautiful Day stamp set. I masked the image and stamped leaf images from Altenew’s garden treasures stamp set.


I masked the newly stamped leaf images and blended squeezed lemon distress oxide ink onto the card background.


I stamped another floral image in a separate area, fussy cut, and set it aside.

Once the ink was dry, I used a stitched die-cut in a slightly smaller size than A2. I also cut Altenew’s fancy “hello” die five times. I glued 4 in a stack and colored the 5th one with a black marker, and glued it to the top of the stack. Finally, I attached it to the card with liquid glue.


For a final touch, I added a thin black satin ribbon to the side.

Card 3

Pink- Sensitive, Caring, Sweet

I created this card with Altenew’s Bountiful Butterflies Layering Stencil. I began with the background stencil, and tattered rose distress oxide ink.

I followed with spun sugar, worn lipstick, and picked raspberries for the butterfly stencil.
I cut my piece smaller than my pink base card and attached a ribbon to the center with double-sided tape.

I heat embossed “I just adore you” from Altenew’s Sentiment Strips 2 onto black card stock and adhered it to the ribbon with double-sided tape.

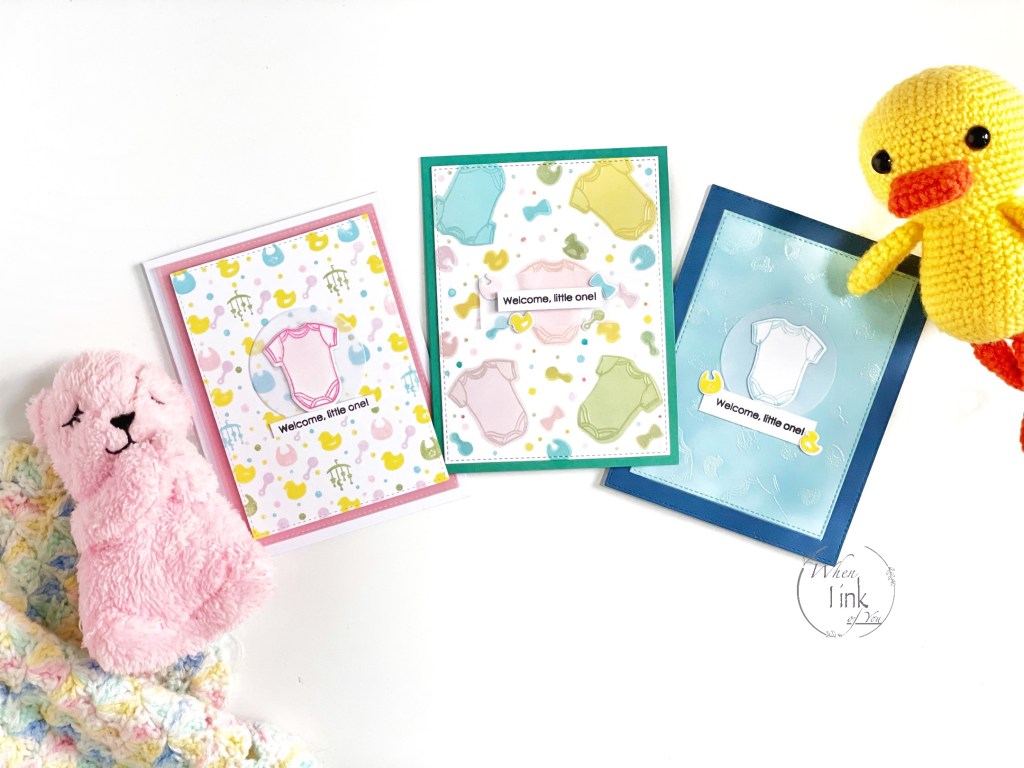
Beyond Basic Backgrounds

This course is all about creating backgrounds that go beyond basic stamping and it helped me think outside the box. I chose a baby theme for all three cards.

Card 1

I began by creating a stencil with the onesie-shaped die. Next, I made five cuts in different directions and created smaller stencils with the rest of the shapes in this set. I then blended ink using the onesie stencil first and followed with the smaller shapes at random. Next, I let the ink dry and then prepared the surface with anti-static powder. Next, I stamped the images with clear embossing ink, poured white pearl embossing powder, and heat set it. Finally, I added various dots using the dot stamps included in this set.


I stamped “Welcome, little one!” on white card stock and attached it to white vellum with foam tape. Next, I added a strip of double-sided tape on the back and attached it to my background. Finally, I added die-cut shapes I set aside when creating the stencils, stamped the images, and attached them to the vellum with liquid glue.


I attached my completed piece to a teal card for a gender-neutral look.

Card 2

I created this card by simply stamping shapes at random to create a patterned paper look. I lightly shaded a die-cut set aside from card one and stamped the onesie outline in picked raspberries ink. I used double-sided tape to attach the cut to a small vellum circle and centered it onto my background. Next, I stamped “Welcome, little one!” onto white card stock and cut it into a small strip. I placed it at the bottom with double-sided tape.


I attached pink vellum to a white base card with double-sided tape. Next, I placed foam tape on the back of my complete patterned paper piece and centered it.

Card 3

I began by blending ink onto white card stock cut to 4.75 inches by 3.5 inches. Once the ink was dry, I prepared the surface with anti-static powder and stamped the images at random. Next, I poured white pearl embossing ink and heat set it.
I placed a onesie die-cut stamped in blue and centered it to a white vellum circle. Next, I added the sentiment on a white strip and attached two die cuts in yellow for a pop of color. Finally, I die-cut navy cardstock with a frame in the center to fit my piece for a simple inlay.

Materials/Products

  • Little One Stamp/Die Bundle
  • Distress Oxide inks Spun Sugar, Picked Raspberries, Tumbled Glass, Squeezed Lemon, Bundled Sage, and Milled Lavender
  • Clear Embossing ink
  • Vellum
  • Black dye ink
  • Double-sided tape